
Bandanas are a fascinating show of capabilities. Any skill level can make them using any number of skills. As a pet groomer, I used to cut triangles out with plinking sheers to make simple bandanas for owners who would rather we didn’t. As a fursuit maker, I make several-step long luxury bandanas with zippers, lobster clasps, and fancy attachment points for people who wear animal costumes. There’s no wrong way to make a bandana. Learn as you go, adapt, and think on ways to improve it.
So this is less of a proper tutorial and more of a showcase, roughly detailing a few methods. Scroll through the topics and start from where you feel comfortable.
Fabric:
The most basic bandana simply requires fabric and scissors. In grooming salons, these were cheap Cotton Quilting Fabric and Plinking Sheers. Both are easy to find secondhand for a little less money, though secondhand fabric can vary in size and make cutting things out accurately a bit harder.
You can, theoretically, use any material. Sequins, lace, old t-shirts, silk, fleece (great for weird shaped bandanas, like drippy ones!), flannel, etc. I’ll note materials that probably won’t work great in the actual tutorials, but the overall nonrecommended fabric is Faux Fur: it’s very messy, will look really weird on both a human and a furry, and it is very sweaty.
Otherwise, mind a few things when picking your fabric: how it reacts when you sweat, how it could get caught in fur/hair, ease of cleaning, and (if you want a zipper bandana) whether or not it’s strong enough to hold up to a zipper and-or carrying things.
I almost exclusively use quilting cotton, usually with fun patterns. It’s light, comfortable, flexible, and looks pretty. I cut it with straight sheers and later serge it, which holds well enough. It’s also recommended to wash your fabric first but… yeah, don’t fret on missing that step.
Findings:
A simple bandana needs no additions, usually being tied. But, for ease of wearing, you can add:
- Velcro. Soft, flexible, easy to wash, and really easy to replace. But it can’t hold any weight and looks a little weird.
- Buttons. The button is easy to fix, while the hole is not. It’s also more difficult to install, but holds weight great.
- Snaps. The sew on ones are easy to install, but they fall off easier. The more common punched in snap is way stronger and prettier, but it is absolutely impossible to fix if it breaks. Snap Tape may work better.
- Ribbon Ends. Tie it in a pretty bow in the back! Also easier to cut off you in an emergency.
- Elastic Ends. Sew the bandana into a complete loop that slides on or off. There are also button elastics that will be detailed later.
In addition, you can install a zipper. I use a #5 zipper with a round pull, but a #10 is less likely to cause damage if caught in fur. If you wear your paws often, opt for a larger pull for ease of use.
A final note on findings: I install plastic lobster clasps on my bandanas, meant to hook onto badges and negate the need for a lanyard. If you’re making this for yourself, you can opt for a nicer metal clasp, or even reuse a clasp from an old lanyard!
The Basics:
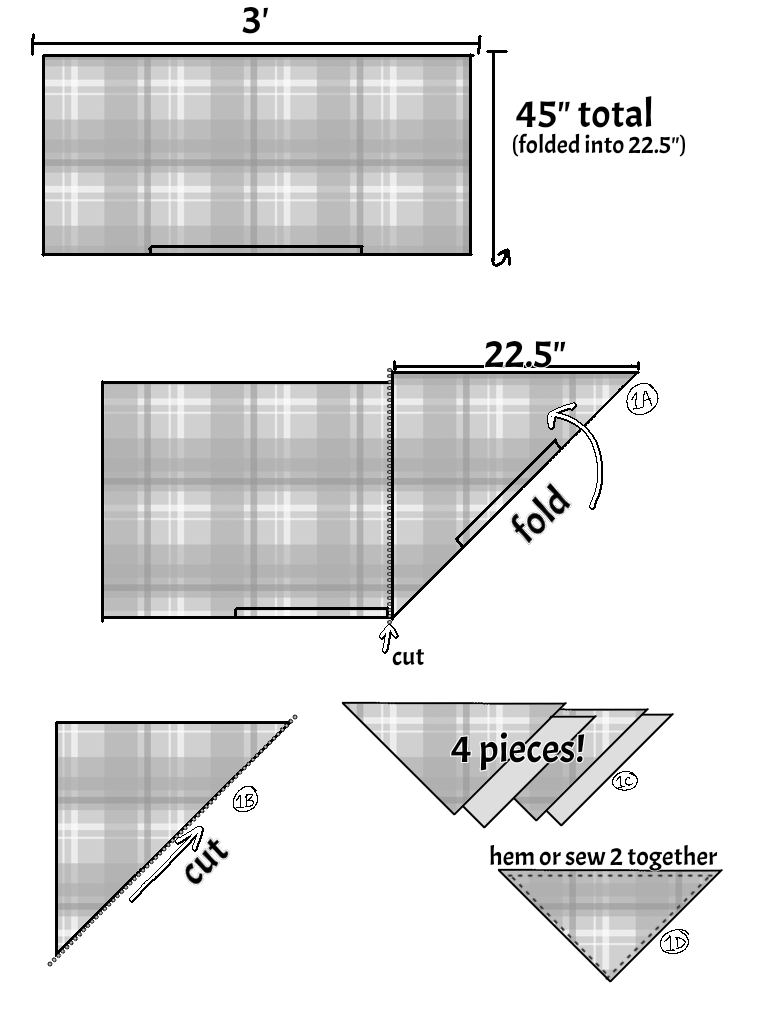
Starting with a full yard of 45″ wide fabric (most cottons come as such), fold in half length-wise. This leaves you with a 3’x22.5″ rectangle.
Take a corner and fold it up in a triangle, towards the top. Cut along where the outer edge now rests inside (see photo for better explaination). Then cut the long, folded edge of the triangle.
Tada! Four large bandana pieces. If you cut them with Plinking Shears, it’ll take longer for them to unravel. You’ll have spares a plenty! If you want just one bandana piece, refrain from cutting the straight edge on step 1A: instead, cut one layer of the long angled edge to get a single triangle. And for two pieces, cut that long angled edge entirely.
Refer to my drawing for that to make more sense, ha.
If you want a smaller bandana, like for a person or a child, fold a single triangle in half and cut the center. Now you have two small pieces! You could also make a smaller triangle during step 1A by folding the triangle stack smaller; ie, only turn 10.5″ rather than 22.5″.
Using one piece, you can hem the edges so they’re not visible from the front. This can be done with sewing (great first sewing machine project!), iron on tape, or a really careful hand with hot glue.
With two pieces, you can make a doublesided bandana! Place the bandanas right side (the pretty side) together. Sew around while making certain you left an opening to turn out, which is the next step. Use a chopstick to get those corners! I recommend pressing with an iron here, but you can finger-press/press flat with a heavy object if preferred. Then topstitch along the entire thing. Add your preferred fitting (velcro, button, snaps, etc) and you’re done!
With two pieces, you can also make a zipper bandana. Check out the below section for a more detailed example of that, and mind that you won’t be able to tie it behind your head: I like using buttons for these, but snaps also work.
With that, lemme share how I make my newer bandanas.
The Complicated:
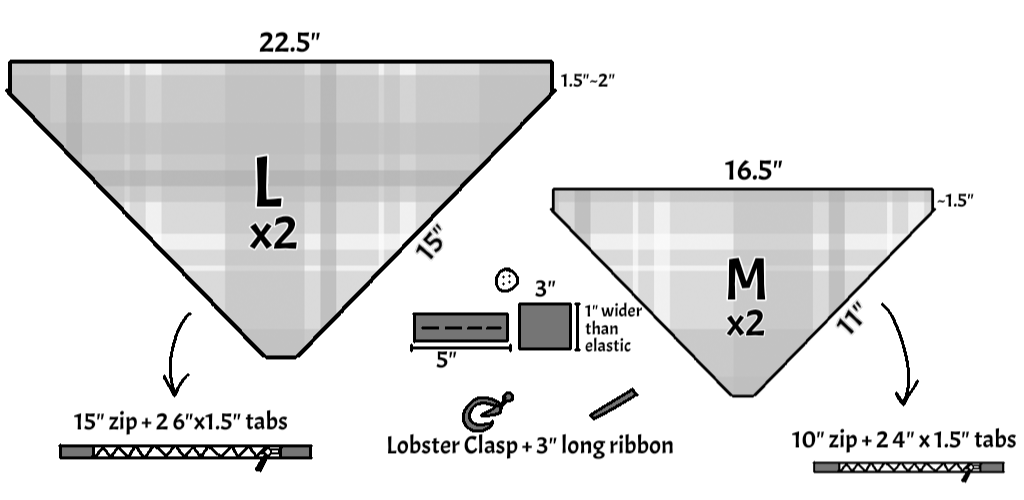
L pattern is for Fursuits. M pattern is for people. All are made with the findings in the center, but I don’t always add zippers. Of particular note is the closure system: it’s a length of button elastic (1″x5″ for me, but you can do whatever), a tab of fabric to clean up the end, and buttons matching the size of the elastic (they usually come with when I buy the elastic). The elastic will be placed on one of the top corners during the sewing process and the buttons will be sewn on once it’s done.
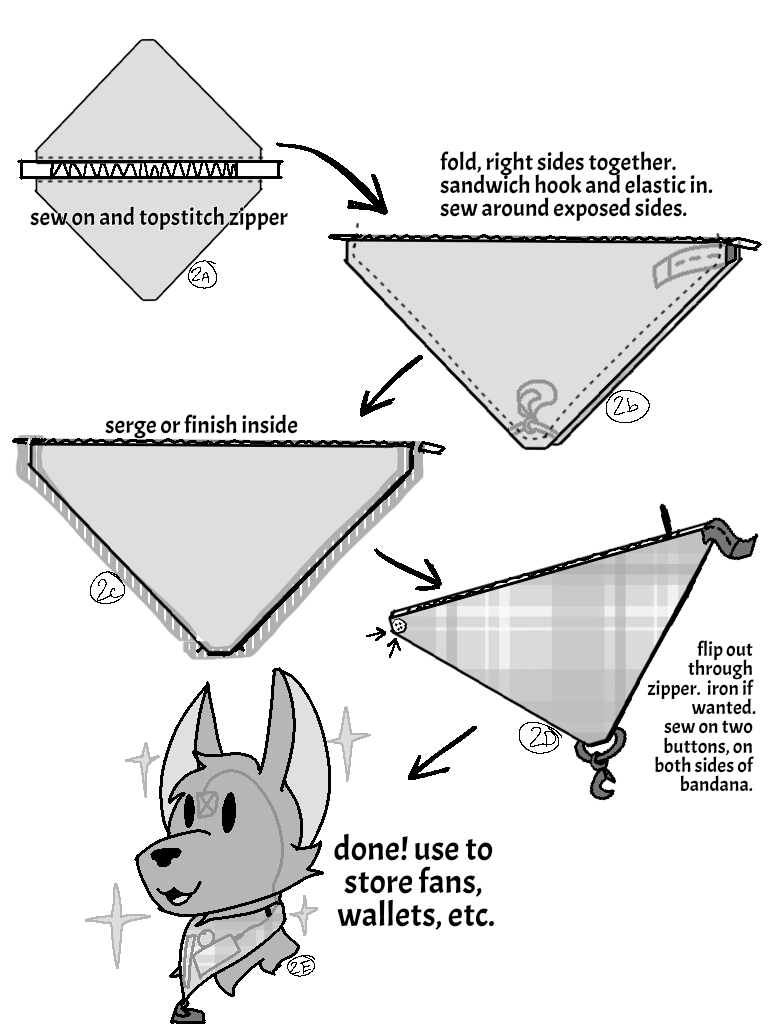
The above image details how to make a zipper bandana! But for just a doublesided bandana, omit step 2A and sew around the entire thing in 2B, leaving a spot for turning out. Be careful not to catch the clasp finding during this!
Final Notes:
With a bandana in hand, you can outfit it a bit! Add pins, embroidery, iron-on nametags, jewelry, etc. It’s your’s and you worked hard on it: so be proud!

Leave a comment