
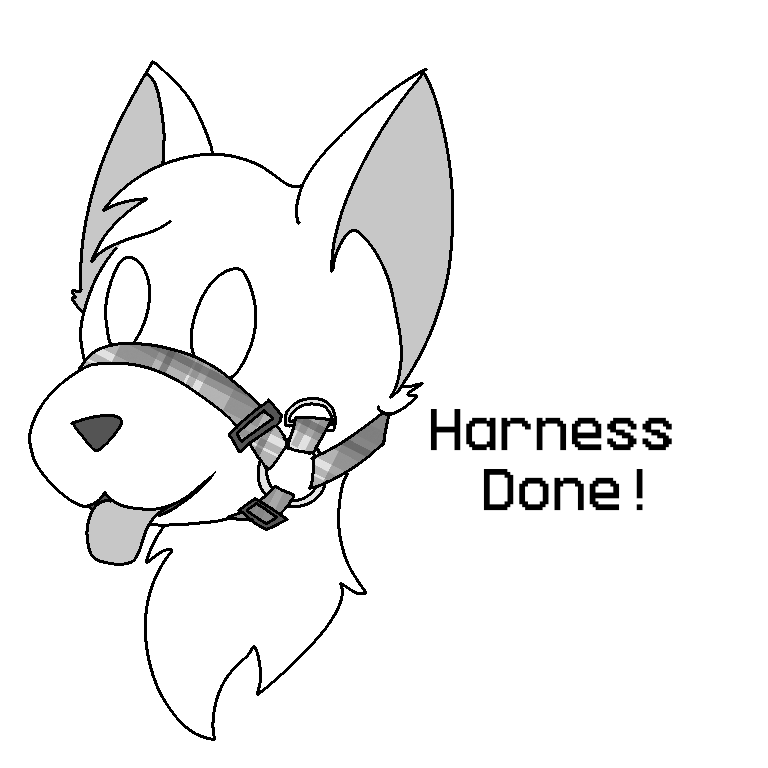
An unfortunately long how-to on some of the backpack muzzle harnesses I made for ANW2025.
A Note on Construction:
These harnesses were designed to make carrying the head easier. The amount of suiters that come to my table and struggle to juggle their head and looking at things is really, really high. My suits now come with built-in loops, but that doesn’t help the vast majority. Thus:
This. With four to six attachment points, and enough straps, you can build a preferred method of wearing based on preference and your suit’s headshape. I tested this on a short nosed goat suit, a long and thin nosed dragon, and a wide long nose dragon. The version I sell (and used for measurements below) has adjusting sliders to fit as many shapes as possible.
However, if you don’t care about carrying straps or making it adjustable, you can cut the straps according to your own measurements and omit certain parts (noted as ‘optional’). I don’t recommend including tri-glide sliders for use on a single head (or an airbrushed suit), as the plastic finding can rub fur down.
Ponder your own needs before making. If you’re not sure about something causing damage, ask your suit’s builder for their recommendation.
Materials/Tools:
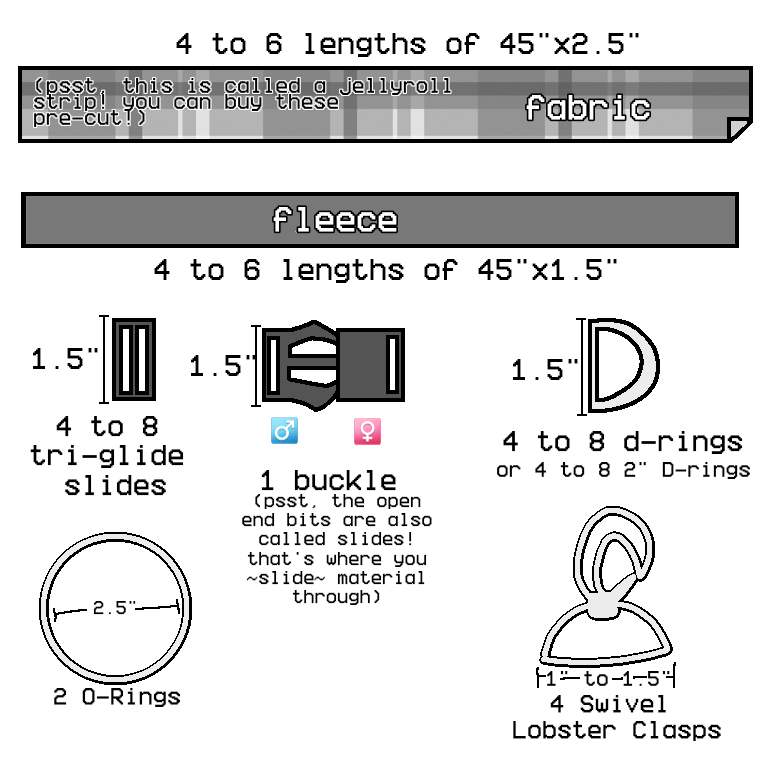
- 4-6 strips of 45″x2.5″ fabric: I use cotton for this. You can buy something called ‘jellyroll strips,’ meant for rug making or quilting, with these dimensions. They usually come in packs of themed fabrics. The one I used was rainbow/pride themed. I don’t recommend stretchy fabric. If you’re only making the harness, you’ll just need 2.
- 4-6 strips of 45″x1.5″ fleece: For structure. I try to use antipill fleece in a single colour so it’s not too busy. If you’re only making the harness, you’ll just need 2.
Note: omit above and use 1.5″ webbing of choice. Polywebbing is popular for its colour, elastic webbing is malleable, but cotton webbing is… y’know. Cotton. And better. In my scholarly opinion.
I also sew the cotton to the fleece in such a way that the fleece still shows on the bottom. Add an inch to the cotton’s width (2.5″ to 3.5″) and encase the fleece if preferred; a good example of that is in my collar tutorial.
- 2 2.5″ O-Rings: I usually buy a pack of ten welded stainless steel rings. That gives enough for five harnesses, but you can also use the spare rings in place of D-rings.
- 1 1.5″ Buckle: Usually plastic. You can splurge for some metal ones though! Alternately, add two inches to back straps and use velcro or a button.
- 4-8 1.5″ Triglide Slides (Optional): For adjusting the length of individual straps. I use 4 on the harness and 2 on the backpack straps, but you can add another 2 to the ear straps.
- 4-8 1.5″ D-Rings (Optional): For attachment points. I usually use 4 on the harness and 4 on the backpack straps, but you can use 5-6 on the harness if desired. Can also be swapped for 4-8 2″ D-Rings to save a few steps.
- 4 1″-1.5″ Swivel Clasps (Optional): Used on the ear straps.
Tools:
- Scissors
- Sewing Machine
- Thread
- Iron (optional)
- Turning Tool (optional)
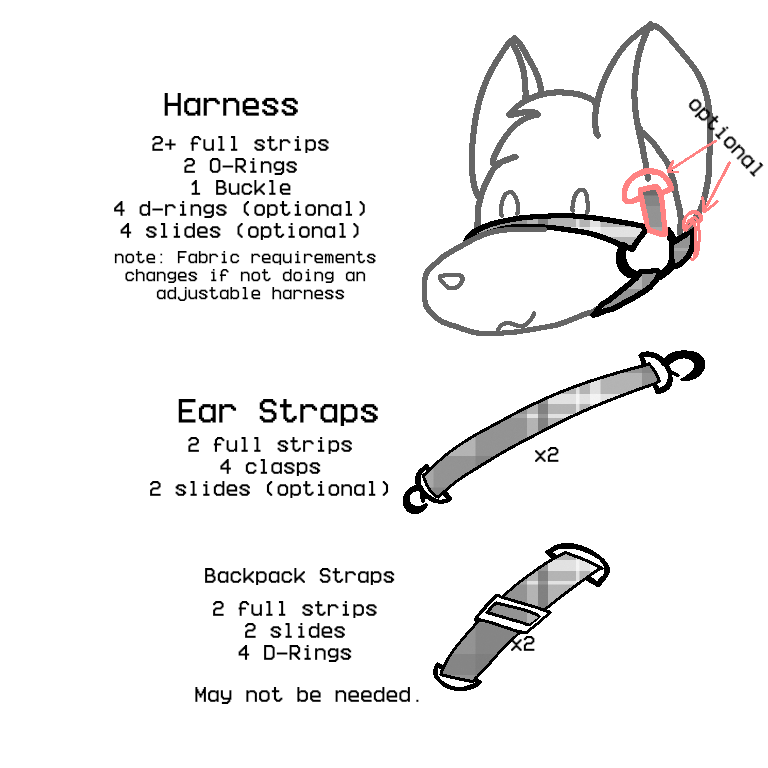
The Harness, using my measurements, calls for: 2+ full strips (2 standard, + for extra attachment points), 2 O-rings, 1 buckle, 4+ D-Rings (optional), 4 slides (optional).
The Ear Straps call for: 2 full strips, 4 clasps, 2 slides (optional). See end of how-to on how they’re used. These can also be attached permanently if wanted.
The Backpack Straps call for: 2 full strips, 2 slides, and 4 D-Rings. These can be omitted, as the Ear Straps can be long enough to fulfill this function on smaller people. If ear straps are permanently attached, I recommend making these.
Making The Straps:

Lay fleece right-side on right side of fabric and sew along long edge. Serging is optional; I find the straps are stiff enough to not worry about them.
Take the other long edge of fleece and place it on the other long edge of the cotton, creating a ‘D’ shape in the fabric. Taking care not to grab any of that excess, sew long edge. Then turn out. This is easiest with a tool, but folding the tube in a little and using a pair of forceps to pull it through also works.
Optionally iron flat.
Then topstitch entire length. Quilting the strap will add a bit of strength and can look kinda cute.
Repeat this for all other strips. For the harness alone, that’s 2. If you want extra attachment points, make a little more. I tend to make 4 full strips and 1 bits of a strip using scrap from making collars (since these often use the same fabric).
The Harness:
Like stated earlier, I recommend measuring your suit and using those numbers instead of mine. Mine are fairly varied and meant to accommodate many sizes of suit, as none are made to order.
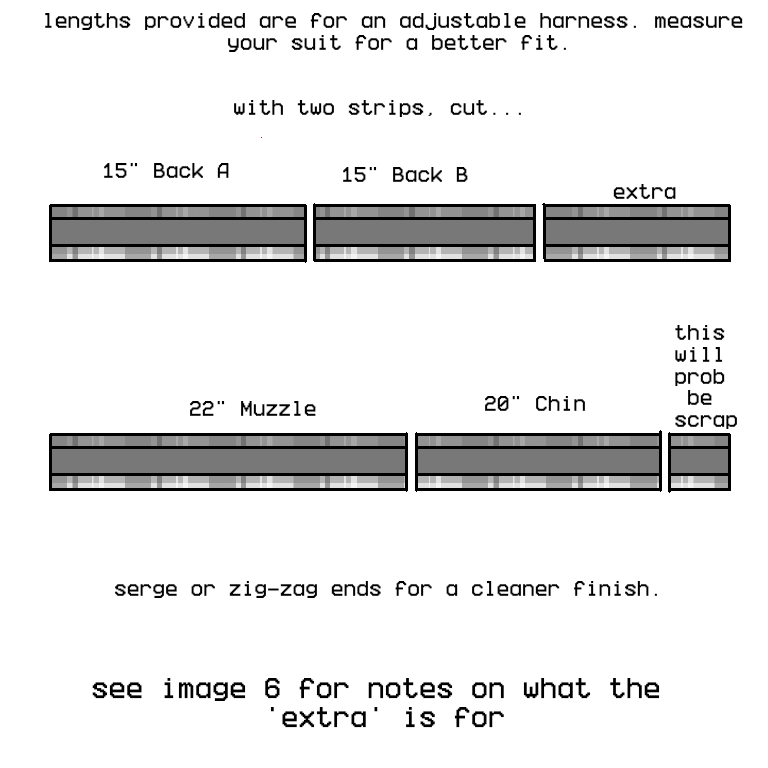
Using my measurements, cut from one strap; 15″ (Back A), 15″ (Back B), and extra (see image six; disregard if not making attachment points). From a second strap, cut 22″ (Muzzle/nose) and 20″ (Chin), with leftovers being likely too little to use.
Serge or zig-zag stitch ends closed.
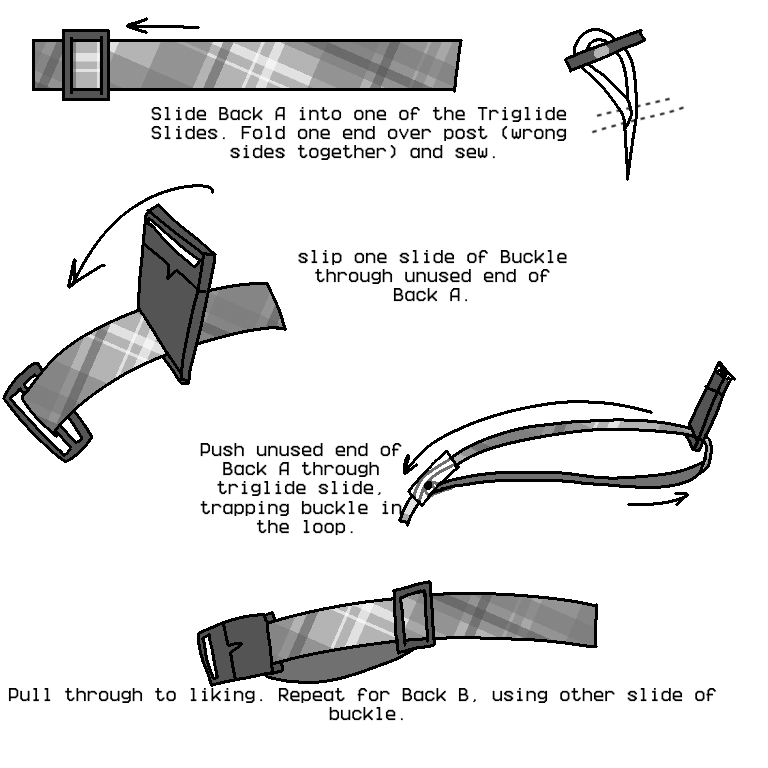
With Back A, install the tri-glide slide. Slip one end over post and sew strap down, wrong sides together. I try to aim for within a 2″ seam allowance.
Slide one end of the unified clip (ie, do not separate buckle) through the strap. Loop unused end of strap through the slides, checking to make sure that the right side faces up; if not, undo slide and flip either the buckle or strap. This usually takes me a few tries. Once it looks right, pull strap through to your liking.
Repeat for other side.
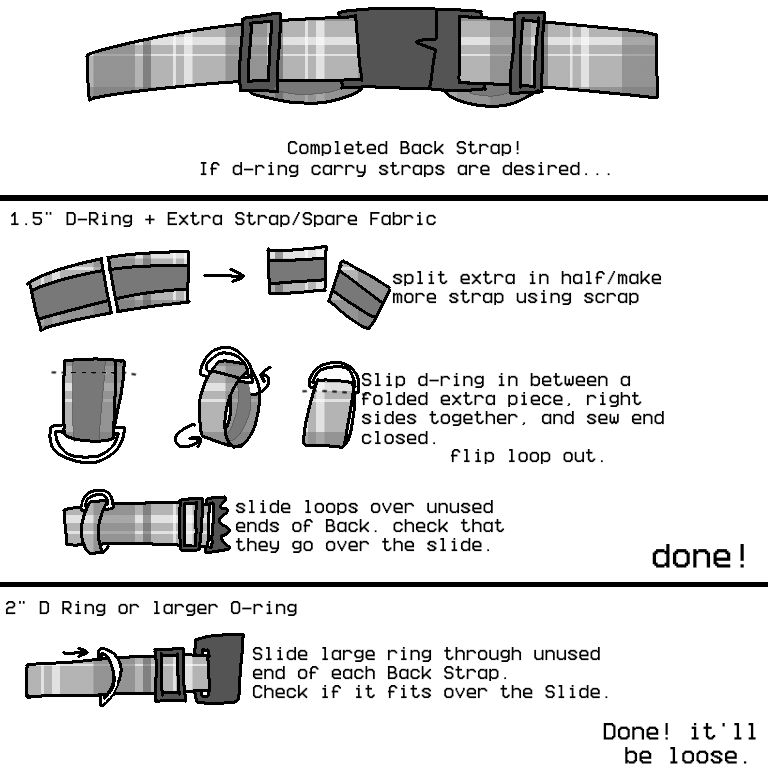
Now you have a completed Back piece.
If you want attachment points, you have two options. You can, using the Extra strap or more you made separately, create loops by sewing right-sides together of a ~6″ piece with the D-Ring inside, flipping it out, and then sliding it onto the back through one of the unfinished ends. Optionally sew D-Ring down so it doesn’t move as much. Check and make sure these all fit over the slides. Repeat for both sides.
Or you can take a 2″ D-Ring and slide it onto the strap (either nor or before the slide was looped through). Check and see if it fits over the slide. This’ll be a bit loose, but less bulky and material-heavy as the prior method.

This set of steps are optional and used only for the backpack attachment points. And, even with that method, you could still omit these and just clip the strap onto the ring directly. I like this design because it provides a tiny bit of recentering and can keep the lobster clasp away from the eyes or mouth.
Take 1 bit of strap, usually less than six inches in length, and sandwich the O-Ring and D-Ring between the right sides. Sew the unfinished ends together. Flip the loop out, right sides out. Optionally, you can stitch the D-Ring into place, sewing as close to the ring as you can.
Repeat for the other side.
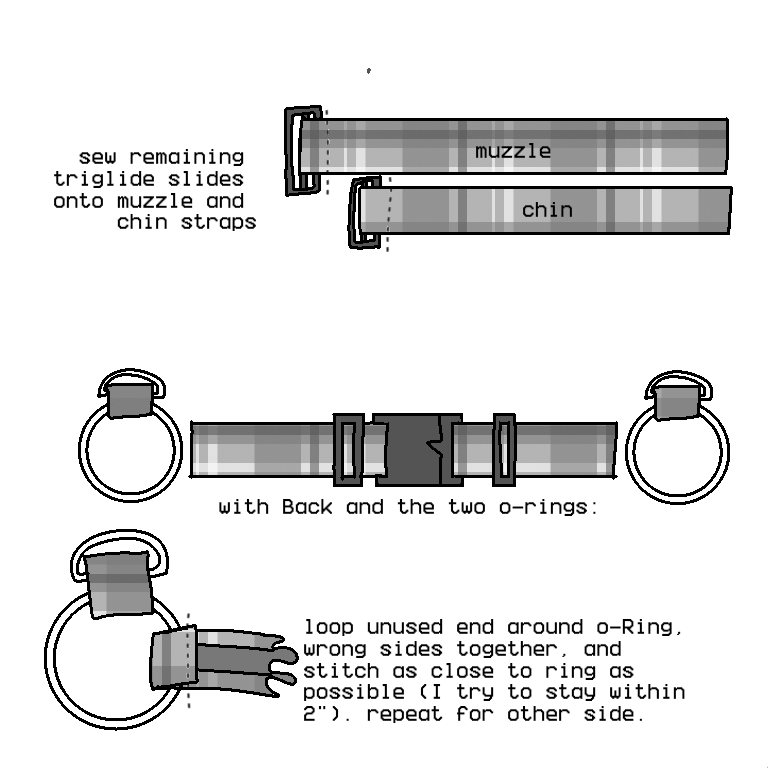
If making an adjustable harness, sew slides onto the Muzzle and Chin straps.
With the Back piece and an O-Ring, fold the unfinished end over the ring, with wrong sides together. Sew as close to the ring as you can; I aim for within 2″. Repeat with the other side of the Back piece.

Loop one side of Muzzle strap and one side of Chin strap over the O-Ring. See diagram for placement; ultimately, you want the Muzzle first, then Chin, then Back, then Cheek Loop around the circle.
Slide the unused ends through their slides, checking to make sure that the whole thing lays flat with the right sides up. If it doesn’t, undo the Muzzle and Chin straps and slide the straps through in different positions. It takes me a few tries.
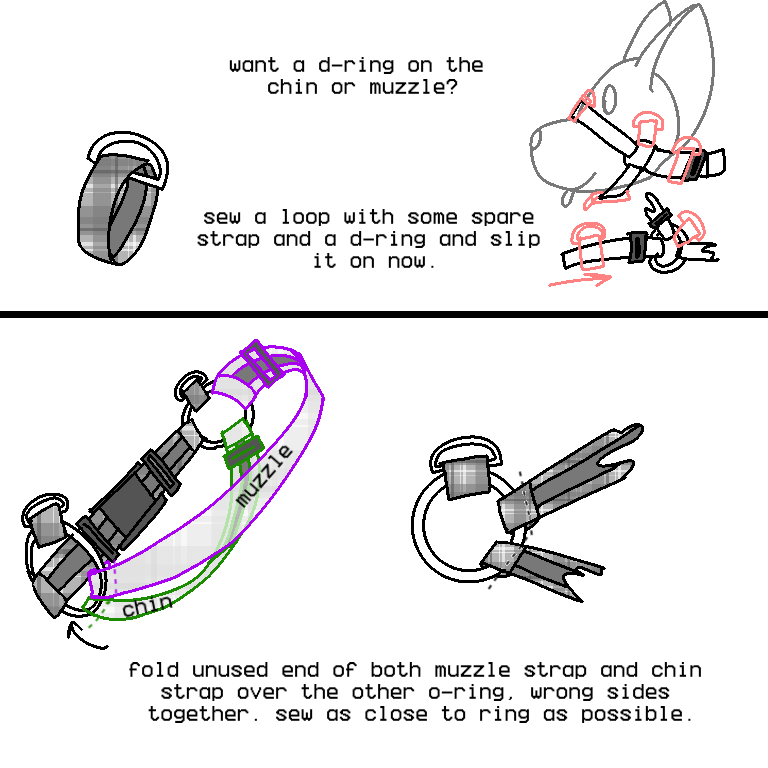
If you want More Attachment Points, now’s the time to make them! Sew a loop (~6″ strap) with a D-Ring inside and slide that over either the Muzzle or Chin straps. Check to make sure it can fit over the slide. The Muzzle attachment would be of more use than the Chin, but the Chin is good for a cute bit of detail. You can also slide a 2″ D-Ring over the straps, but I don’t recommend this for the Muzzle due to the pressure on that part and the often delicate sewing around that section of the face. Use your own judgement.
Loop the Muzzle and Chin straps over the other O-Ring, wrong side to wrong side. Make sure the Muzzle strap remains ABOVE the Chin Strap. Both straps should have their right sides facing OUT and their wrong sides facing IN. Sew as close to the ring as possible and make sure the two straps are not tied together. I usually put my tag on the Chin at this seam at this point: it helps to keep the two lengths seperate and provide a bit of context for what goes where.
All done!
Adjust, fiddle, and tack down things as you please.
Ear Straps:

As I somehow own no fursuit heads with ears, and all of my premades at this time either have no ears or the most ridiculous ears possible, these are built seperately from the harness. There is nothing keeping you from using a measured strap in the place of the Cheek Strap to loop around the ear and Back panel. This is just how I do it.
And, honestly, I use easy Method B. That’s just sewing the Clasps (usually 1″) onto either end of the strap. This limits bulk in favour of flexibility and a long strap. See next image for why.
Otherwise, sew a slide onto the end of one strap, wrong sides together. Slide a clasp through the other end and loop the strap through the slide again, leaving the clasp loose. Sew down the second clasp on the end. That’s a very basic strap tutorial that can be applied to the Backpack Straps as well, though I usually use D-Rings instead of Clasps when paired to the Harnesses’ standard Ear Straps.
Wearing/Strapping:
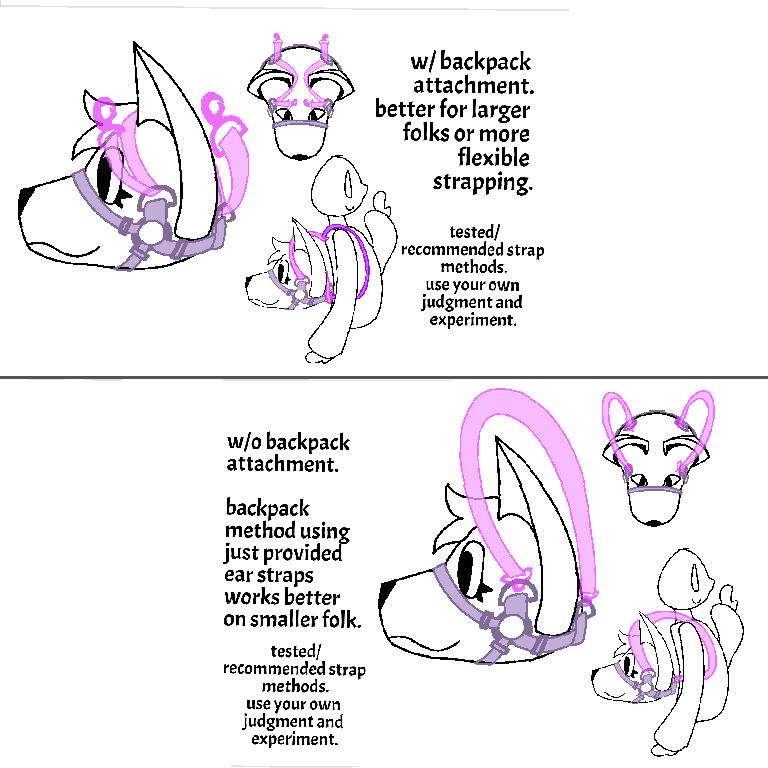
This is the card I include with my harnesses, detailing two methods of wearing. The bottom method works better with smaller people (ie, me and my 5′ stature) but the top + extra straps has more flexibility to it. Loop and strap as you see fit.
If you meet me at a show, and it isn’t too busy, I’m happy to try and help you set up a system.

Leave a comment