
I recently went and fixed up some of my old, unsold collars, so it seemed suiting to get a tutorial out!
This is, still, more of a showcase; but hopefully it’s a good place to start your research. Collars are a nice project to learn stuff like straight lines, ironing, keeping things flat, and putting in a tri-glide slide. Don’t worry if that last one takes a while to get down. I only learned it 14 years into my 15 year career.
Materials:
I use Quilting Cotton and Fleece for my fabrics, plus plastic hardware (2″) whenever possible. The D-Ring is usually metal though.
You can use all metal hardware if you please. It adds some luxury and strength to a finished item but is harder to clean. It also patinas, which can look as lovely as it can look like gunk. As for fabric, you can use wide elastic (good for play) or webbing (cotton or the plasticy kinds) instead of fleece and cotton. You can also just use fleece; or minky, for a slightly more luxurious look.
I really don’t recommend a stretchy material. Elastic lengths (like what is used in pants) is much more stable than most stretchy fabrics, making it an exception. Bonding a stretchy material to fusible fleece will negate some of the problems, though you still might need a stretch needle and too much patience.
(Also, I don’t use webbing because the fun webbing is all plastic and I have a grude against it. No shame on you if you choose otherwise. Using it in place of fleece here results in a very stiff collar, which may appeal to you.)
The Process:

To make a 2″ tall collar, you’ll need:
- 1 38″x5.5″ length of cotton quilting.
- 1 37″x1.9″ to 2″ length of fleece. 2″ results in a tiny bit more bulk.
- SUB for above: 1 38″x2″ length of your choice of webbing.
- 1 2″ triglide slide.
- 1 2″ buckle. The two halves are noted as ‘female’ and ‘male,’ but which goes on first doesn’t really matter. I just prefer the look noted below.
- 1 2″ D-Ring. Silver metal is most common but matching to the rest of the hardware looks best.
The easiest way to get the hardware is by purchasing a ‘dog collar kit,’ which usually comes with a few sets of the last three items. Plenty for gifts, trade stock, or to start selling on your own!
I like the size of a 2″ collar on a suit, but you may want something smaller. Scale the fabric’s width down accordingly.

If using webbing, skip to the third photo.
Fold the cotton in half lengthwise, right sides together, and sew along the open top. I use a 1/4th” stitch for this, but you can add more for comfort. Leave the sides open.
Turn the cotton tube so that it lays flat with the seam facing up. Finger-press the seam’s edges down flat.
Then lay fleece (also known as a core or interfacing in this situation) down on top of seam, roughtly in the center of the tube. Line one end up with the tube’s end, leaving about an 1″ of only cotton on one side. Sew the lined up end.
SUB: It’s easier to sew the fleece down through the top seam in step one, but I find this adds too much central bulk. It does, however, keep the fleece in one spot. You can also sew one end down now and get to the next step but, again, that adds bulk.

Turn out the collar. I have a plastic tube and a stick (called a turning tool) that I bought ages ago, but you genuinely don’t need one for this. A simple stick (like a chopstick) and some fiddling will do. You can also make your own turning tool with some pipe.
During this time, mind the lay of the fleece. You can shift it around in the cotton with your fingers or a stick, but I find pulling on the length inside the still-open tube sorts it out generally.
Iron! Not required but usually a good idea. Keeps things nice and flat without pins. Plus, it’s much harder to iron later, so getting things crisper now will make it look good for longer.

Topstitch entire collar. Also optional, but given that my methods don’t have the fleece secured in most areas, I recommend it. It adds some extra structure too. You can either serge the open end, zig-zag stitch it on a machine, or fold it in on itself and topstitch it close. I usually serge but the last option looks best, even if it adds bulk.
(psst, start here for a webbing collar!)
Pull that end of the collar through the slide, good side up. Then fold that end down and sew, matching the sides with seams to eachother. Try to get as close to the slide as you can without damage to your sewing machine; I usually aim for within 3″.
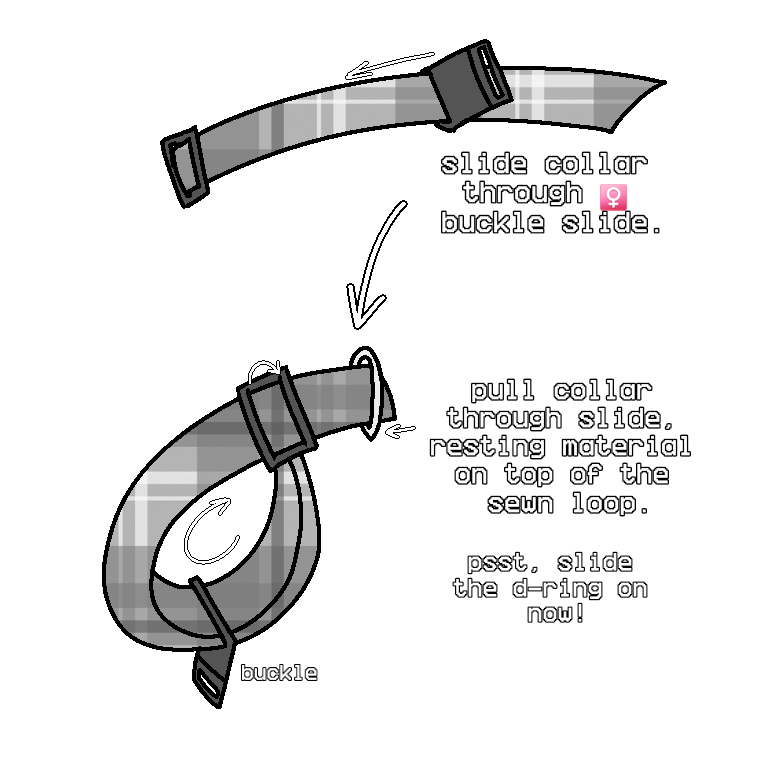
Take your collar and push it through one of the buckle’s slides. I usually do this part with the ‘female’ side, solely because it results in not having to shove the larger part of the buckle under my sewing machine. Depending on your buckle, it may have a single slide on one part and a built-in triglide on the other.
Push the collar’s end through the slide, essentially resting that material on top of the sewn loop. Pull it through a bit. The plastic buckles I use have a curve to them, so now’s the time to make sure that curve rests nicely; test-fit the collar by finishing the loop, making sure the buckle is curving away from the inside of the neck. You’ll see what I mean when working with it.
If you looped the collar through the male buckle’s slide, undo that and slip the D-Ring on. It can be loose for right now.

While the buckle is, well, buckled, loop the collar around the male buckle’s slide. Pull through about 3″ (or less preferably; use however much you feel you can sew) and secure with a pin. Then unclip the buckle.
With the collar flat, move the D-Ring as close to the buckle as you can. Then sew that end. If you’re having trouble, give yourself a little more room by pulling the collar through the slide more. It will be awkward. There’s no getting around that.
I usually sew on my business tag around this point. It fits nicely on this spot.

All done!
Now you have a big, fursuit-sized collar. Be safe with it: it is a choking hazard and could interfere with getting your head off in a panic. You are also not allowed to wear a leash at most cons, even if it’s really cute and genuinely keeps you from wandering off from your handler. Their rules go.
If this tutorial doesn’t help with your project, try Matrices’ tutorial blog. Or just look up how to sew a dog collar. It’s the same idea, just scaled up.
Alternate Methods:
If you want a flat, non-adjustable collar;
Measure your fursuit’s neck circumference WHILE IT IS ON YOU. Then add ~5″ to that length for attaching the buckle. Use the same width listed above (5.5″) while cutting out material. For fleece, take your neck measurement and add 3″~4″.
Sew the buckles on by pulling the fabric through each slide and sewing down. For the D-Ring, you can take a scrap of cotton/webbing and lay it down on top of the collar’s length, sandwiching the ring there. Or you can just slip it on before sewing one side of the buckle and letting it be loose. It won’t come off the collar but it will be highly adjustable.

Leave a comment